AI product photography: generate studio shots without a camera
AI product photography can generate studio shots without a camera—meaning you can create clean packshots, lifestyle scenes, and consistent angles for e-commerce without booking a photographer, renting a studio, or waiting days for edits. This guide shows how to do it responsibly and professionally: what “camera-free” really means, how to write prompts that produce usable images, and how to turn AI visuals into conversion-ready listings using Gen AI Last.
What “AI product photography” means (and what it doesn’t)
When people search for “ai product photography generate studio shots without a camera”, they usually want the look of a professional studio—controlled lighting, crisp shadows, clean backgrounds, and consistent styling—without the typical overhead. AI image generation can deliver that look from text prompts and references, but it’s important to understand the boundaries.
- AI can generate new images that resemble studio photography (packshots, hero images, lifestyle scenes) based on prompts and your guidance.
- AI cannot always guarantee exact product geometry, logos, or fine details unless you provide strong references and validate outputs carefully.
- AI studio shots work best for: concepting, marketing creative, social ads, seasonal refreshes, background/lifestyle variations, and early-stage listings.
- For regulated categories (medical devices, supplements) or where visual accuracy is legally critical, you should use stricter review processes and consider mixing AI with real product images.
Gen AI Last supports an end-to-end content workflow: generate the images, then create matching product descriptions, ad copy, and even short product videos and voice-overs from the same creative brief using our AI content tools.
Why studio-quality visuals matter for e-commerce conversions
A strong product image set does more than “look nice”. It reduces uncertainty, improves perceived quality, and helps shoppers imagine ownership. AI can help you achieve core e-commerce visual requirements fast:
- Consistency: uniform lighting, background, and angle across a product line.
- Speed: generate variations for A/B tests, seasons, and promotions in hours—not weeks.
- Cost control: fewer reshoots, less retouching, and less dependence on external studios.
- Creative breadth: lifestyle scenes for ads and social without scouting locations.
For small teams, the biggest win is iteration: you can test background colours, props, and compositions before committing to a final direction.
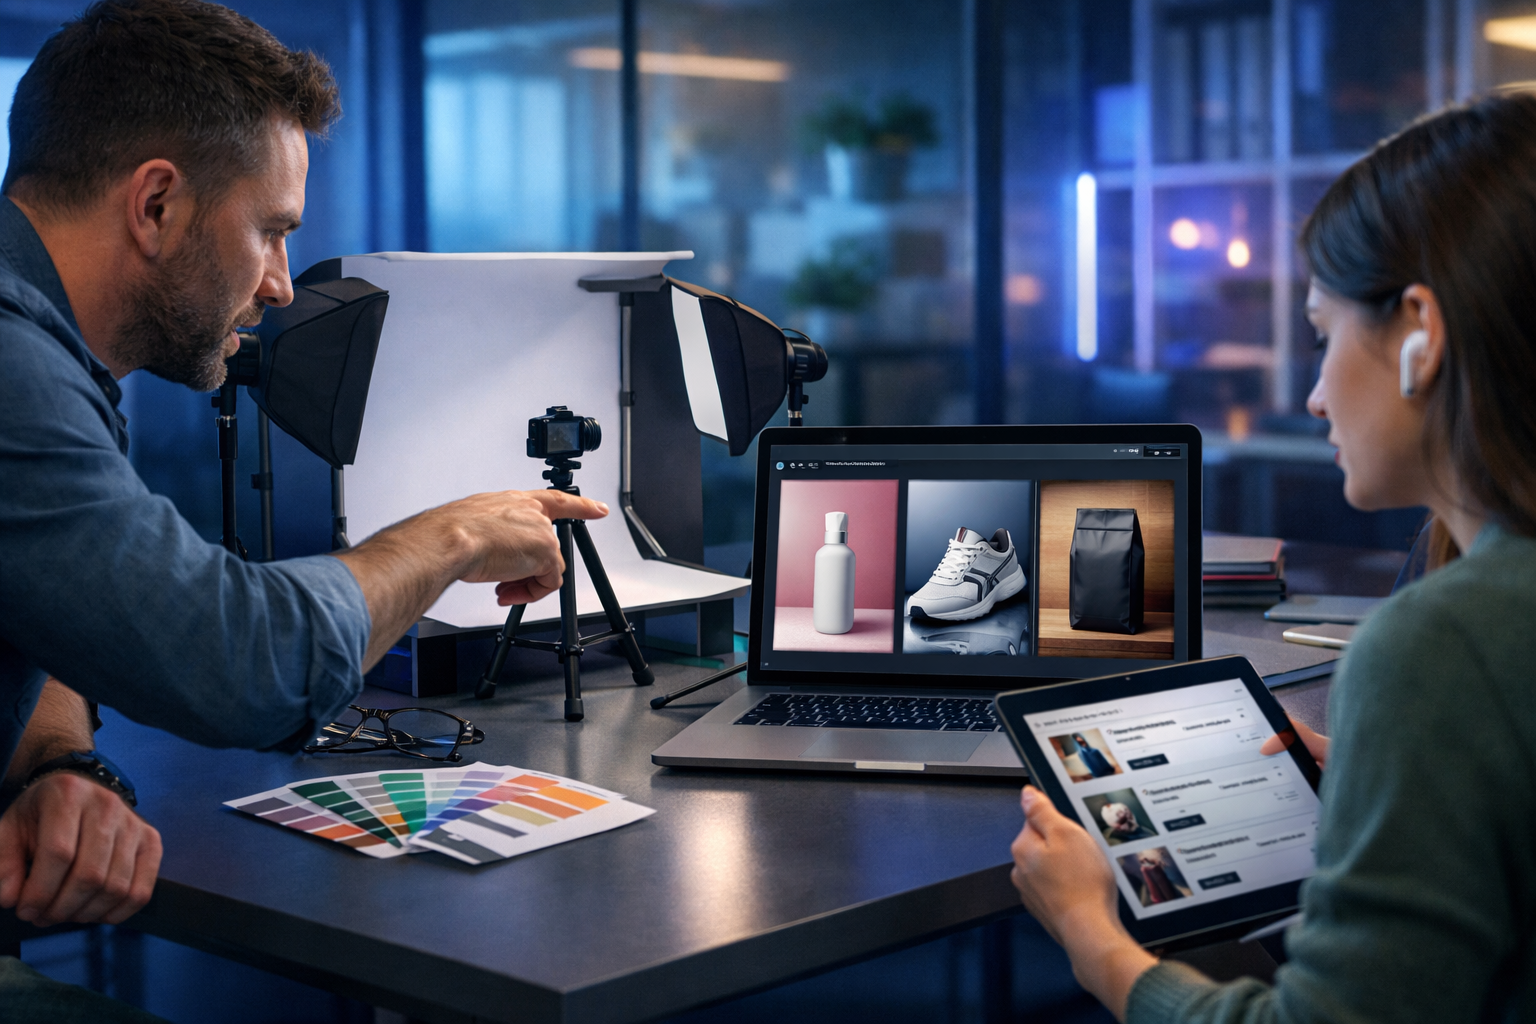
The practical workflow: generate studio shots without a camera
Here’s a proven, repeatable workflow you can use for AI product photography. It’s designed for online shops, Amazon-style listings, Etsy, Shopify, and paid social creative.
Step 1: Write a “product visual brief” (5 minutes)
Before you prompt any AI, capture the details that matter. This keeps images consistent across generations and across team members.
- Product: type, materials, finish (matte/gloss), colour, key features.
- Angles: front, 45-degree, side, back, top-down, detail macro.
- Lighting: high-key (bright, minimal shadows) or low-key (dramatic).
- Background: pure white, light grey gradient, coloured paper sweep, marble, wood, etc.
- Output formats: 1:1 for marketplaces, 4:5 for Instagram, 16:9 for banners.
Tip: Use Gen AI Last’s text generation to standardise briefs for each SKU (and store them in your internal docs). Then reuse the same structure each time.
Step 2: Start with a clean “packshot” prompt
Packshots are the foundation: neutral background, clear lighting, minimal distractions. Even if you plan lifestyle images, begin here to lock in the look and geometry.
Example prompt (packshot)
- “Photorealistic studio packshot of a premium 250ml amber glass dropper bottle with matte black cap, centred, clean label area blank, on a seamless light grey background, soft diffused softbox lighting from front-left, gentle natural shadow under the bottle, 85mm lens look, high detail, sharp focus, no text, no logos, no hands, no extra objects.”
In Gen AI Last, generate multiple variations and select the one with the best silhouette, shadow realism, and edge definition. If you see warped edges or odd reflections, tighten the prompt (e.g., “perfect cylindrical shape”, “clean glass reflections”).
Step 3: Add controlled variations (angles, backgrounds, props)
Once you have a baseline, create a set that covers what shoppers need: multiple angles, close-ups, and use-case context. Keep changes deliberate—one variable at a time—so you don’t lose consistency.
- Angle series: “front view”, “45-degree”, “top-down”, “macro detail of texture”.
- Background series: “pure white”, “soft gradient”, “warm beige paper sweep”.
- Lighting series: “high-key”, “dramatic rim light”, “soft natural window light”.
- Prop series (lifestyle): add 1–2 props that reinforce benefits (e.g., coffee beans for a coffee bag; bathroom tile for skincare).
For a professional, catalogue-ready set, aim for 6–8 images per SKU: 1 hero packshot, 2–3 angles, 1 macro detail, 1 scale/context image, 1 lifestyle image.
Step 4: Use negative constraints to prevent common AI mistakes
AI product images often fail in predictable ways. Your prompts should actively prevent these issues. Add explicit constraints like:
- No text, no logos, no watermark (unless you can reliably control branding and have rights).
- No extra objects (for packshots), “single product only”.
- No deformation: “no warped edges”, “accurate geometry”, “symmetrical”.
- Realistic materials: “realistic plastic/glass reflections”, “natural shadow”.
If you repeatedly get weird shadows or floating objects, specify the surface: “placed on a matte white tabletop” and “contact shadow under product”.
Prompt formulas you can reuse (with examples)
The fastest way to scale AI product photography is to use a repeatable prompt template. Swap variables (product, background, lighting, angle), but keep the structure stable.
Formula A: Studio packshot template
Template: “Photorealistic studio packshot of [product] made of [material], [colour/finish], centred, [angle], on [background], lit with [light setup], [shadow style], [lens/look], sharp focus, high detail, no text, no logos, no watermark, no extra objects.”
Example (sneaker): “Photorealistic studio packshot of a minimalist white leather trainer with gum sole, clean stitching, 45-degree angle, on a seamless pure white background, high-key softbox lighting, soft natural shadow, 85mm product photography look, sharp focus, high detail, no text, no logos, no watermark, no extra objects.”
Formula B: Lifestyle hero image template
Template: “Photorealistic lifestyle product photo of [product] on [surface] with [1–2 props], [environment], [time of day/lighting], shallow depth of field, premium editorial look, natural shadows, no text, no logos, no watermark.”
Example (coffee bag): “Photorealistic lifestyle product photo of a matte black 1kg coffee bag standing upright on a rustic wooden counter with a small bowl of coffee beans, cosy modern kitchen, warm morning window light, shallow depth of field, premium editorial look, natural shadows, no text, no logos, no watermark.”
Formula C: “Marketplace compliant” plain background template
Some marketplaces prefer clean, simple images. Keep it conservative and avoid anything that looks like an ad.
Example: “Single [product] isolated on pure white background, centred, true-to-life lighting, soft shadow directly beneath, no props, no text, no logos, no watermark, high resolution, sharp edges.”
How to keep images consistent across a whole product line
Consistency is the difference between “nice images” and a brand that looks established. With AI-generated studio shots, consistency comes from standardisation and review.
Create a visual style system
- Background rules: pick 1–2 core backgrounds (e.g., pure white + light grey gradient).
- Lighting rules: define “high-key” and “moody” presets and stick to them.
- Camera look: keep lens style consistent (e.g., “85mm lens look”).
- Composition: centre alignment, fixed crop, consistent negative space for thumbnails.
Store your approved prompt templates in a shared doc. Gen AI Last’s text generation can produce a standard prompt pack for each SKU family (e.g., “all skincare bottles”, “all candles”), reducing trial-and-error.
Use a QA checklist before publishing
- Edges: no melting or unnatural curves.
- Materials: reflections and textures look real (glass looks like glass).
- Shadow: consistent direction and contact with the surface.
- Brand safety: no accidental, unreadable text or fake marks.
- Truthfulness: colour and form match the product you sell.
If something feels “off”, it usually is. Regenerate with tighter constraints rather than trying to fix major issues later.
Turn AI images into complete product listings (images + copy + video)
The most efficient approach is to generate your product creative and your written assets from the same brief. With Gen AI Last you can create an integrated listing package:
- Product descriptions: benefits-led, SEO-friendly, and aligned with what the image communicates.
- Ad copy: multiple angles and hooks for Meta/Google campaigns.
- Short videos: simple product demo clips or animated showcases for social.
- Voice-overs: narration for product explainers or UGC-style scripts.
Explore our AI content tools to build this full stack from one prompt, or view pricing from $10/month if you want all features (text, image, audio, and video) on a small-team budget.
Practical use cases: what to generate first
If you’re new to AI product photography, start with the assets that deliver the quickest business impact.
1) New product launch concepting
Before you spend on samples and shoots, generate concept images: hero packshots, colourways, and lifestyle scenes to validate positioning. Use them for internal planning, pitch decks, and pre-launch landing pages (with clear disclaimers if the exact product is not final).
2) Catalogue refresh for existing SKUs
If your store has inconsistent photos (mixed lighting, different backgrounds), AI studio shots can “re-platform” your catalogue into one cohesive look. Standardise prompts, generate a complete set, then update listings in batches.
3) Seasonal marketing creatives
Generate holiday-themed or seasonal scenes without building physical sets: winter neutrals, spring pastels, summer outdoor vibes. Keep the product the hero; let the environment support the story.
Common pitfalls (and how to avoid them)
AI-generated studio shots can look stunning, but a few mistakes can harm trust and conversions.
Unrealistic proportions or impossible features
If the AI invents a cap shape, adds seams, or changes the silhouette, shoppers may feel misled. Avoid by using more explicit product descriptors and selecting outputs that match reality. When in doubt, keep AI to lifestyle backdrops and use at least one real packshot for reference.
Accidental fake text and branding
AI sometimes adds pseudo-labels. For most products, prompt “blank label area” and “no text” to keep it clean. Add branding later with proper design tools if needed.
Over-stylised “AI look”
Highly surreal lighting and plastic-like textures can reduce trust. Prompt for “photorealistic”, “natural shadow”, and “realistic reflections”, and avoid overly cinematic descriptors unless your brand genuinely suits that style.
A simple prompt pack you can copy for your next shoot (camera-free)
Use these as a starting point and replace the bracketed fields.
- Hero packshot: “Photorealistic studio packshot of [product], centred, front view, seamless pure white background, high-key softbox lighting, soft contact shadow, 85mm lens look, sharp focus, no text, no logos, no watermark.”
- 45-degree angle: “Photorealistic studio packshot of [product], 45-degree angle, light grey gradient background, diffused softbox lighting, gentle shadow under product, crisp edges, no text, no logos, no watermark.”
- Macro detail: “Extreme close-up macro product photo of [feature: texture/cap/material], studio lighting, shallow depth of field, ultra-detailed, realistic materials, no text, no logos.”
- Scale/context: “Photorealistic product photo of [product] next to a neutral reference object for scale (e.g., hand silhouette or simple ruler-free object), clean studio background, soft light, no text, no logos.”
- Lifestyle: “Photorealistic lifestyle product photo of [product] on [surface] with [1 prop], [environment], soft natural window light, premium editorial style, shallow depth of field, no text, no logos, no watermark.”
How to decide when to use AI vs a traditional shoot
AI product photography is not an all-or-nothing choice. Many brands mix approaches:
- Use AI for speed, concepting, background/lifestyle variations, and large catalogues where full studio coverage is unrealistic.
- Use traditional photography when you need strict accuracy (exact colour, compliance categories), complex reflective products (high-gloss metal), or when marketplace rules demand real photos.
- Hybrid approach: capture one real hero image per SKU, then generate additional AI lifestyle scenes and ad creatives around that consistent product identity.
The goal is commercial performance: clearer listings, faster iteration, and stronger creative testing.
Get started with Gen AI Last (and keep it affordable)
If you want to generate studio-style product shots without a camera and then turn them into complete marketing assets, Gen AI Last is built for the full workflow: images for listings and ads, text for descriptions and campaigns, plus video and audio for social and product pages.
- Generate packshots and lifestyle scenes with AI image generation.
- Create SEO-friendly product descriptions, FAQs, and email campaigns with AI text generation.
- Produce short promo videos and product demos with AI video generation.
- Add voice-overs, narration, or background music using AI audio generation.
You can start creating for free and scale when ready. When you do, view pricing from $10/month—all plans include full access to text, image, audio, and video generation, which is ideal for startups and small teams that need to move quickly.
FAQ: AI product photography without a camera
Can AI-generated studio shots be used on product pages?
Yes, provided they accurately represent what customers will receive and comply with the rules of your sales channels. Always review for distortions and misleading details.
How do I make AI images look more “real”?
Prioritise realistic lighting and materials: softbox or window light, natural contact shadows, photorealistic reflections, and simple backgrounds. Avoid over-stylised effects unless they match your brand.
What images should I generate first for maximum impact?
Start with a hero packshot and 2–3 consistent angles. Then add one macro detail and one lifestyle image for ads. This set improves conversion and gives you creative variety.
Do I still need a camera at all?
Not always. Many brands go fully camera-free for early-stage marketing and concepting. For strict accuracy, compliance, or premium hero imagery, a hybrid approach (real + AI) is often best.
Ready to Create with Generative AI?
Join thousands of creators using Gen AI Last to generate text, images, audio, and video — all from one platform. Start your 7-day free trial today.
Start Free — Try 7 DaysQuick Links
Create AI content from $10/month
View Plans