AI product photography: generate studio shots without a camera
AI product photography can generate studio shots without a camera, turning a simple text prompt (and optionally a reference image) into clean, ecommerce-ready visuals. If you sell online, this means faster listings, more ad creatives, and consistent brand styling—without booking a studio or waiting on retouching.
What “AI product photography” actually means (and what it doesn’t)
When people search for “ai product photography generate studio shots without a camera”, they usually want one of three outcomes: (1) studio-style product images on clean backgrounds, (2) lifestyle scenes that look like a professional shoot, or (3) variations of angles, colours, and lighting for ads and listings.
AI product photography uses generative image models to create or enhance product visuals. Depending on your inputs, AI can:
- Generate a product shot from a text description (useful for concepts, prototypes, or placeholder imagery).
- Recreate a product based on a reference image (best for real products where accuracy matters).
- Change the scene around your product: backgrounds, lighting, props, and environments.
- Produce variants for A/B testing: different hero images, colourways, compositions, and seasonal themes.
What it doesn’t do perfectly (yet) without care: guarantee exact dimensions, precise brand colours, or legally safe mimicry of another brand’s distinctive trade dress. The rest of this guide shows how to get reliable results with a practical workflow.
Why generate studio shots without a camera?
Traditional product photography is excellent—but it’s also time-consuming and expensive when you need frequent updates. AI workflows are a strong fit when you:
- Launch new SKUs often and need images immediately.
- Want consistent lighting and composition across a catalogue.
- Need dozens of ad creatives for paid social.
- Sell in multiple regions and need localised visuals quickly.
- Don’t have access to a studio, props, or a photographer.
With Gen AI Last, you can generate product images plus the supporting assets—product descriptions, ad copy, and even short promo videos and voice-overs—in one place via our AI content tools.
The three core approaches (choose the right one)
1) Text-to-image: best for concepts and rapid experimentation
If you only have an idea (not final packaging or a physical sample), text-to-image can create convincing studio visuals. This is ideal for pitch decks, landing pages, or pre-launch campaigns—provided you clearly label concept imagery where appropriate.
2) Reference-led generation: best for accuracy
If you already have a basic photo (even a phone shot), reference-led workflows help preserve brand cues (shape, label layout, materials) while improving the setting, lighting, and overall polish.
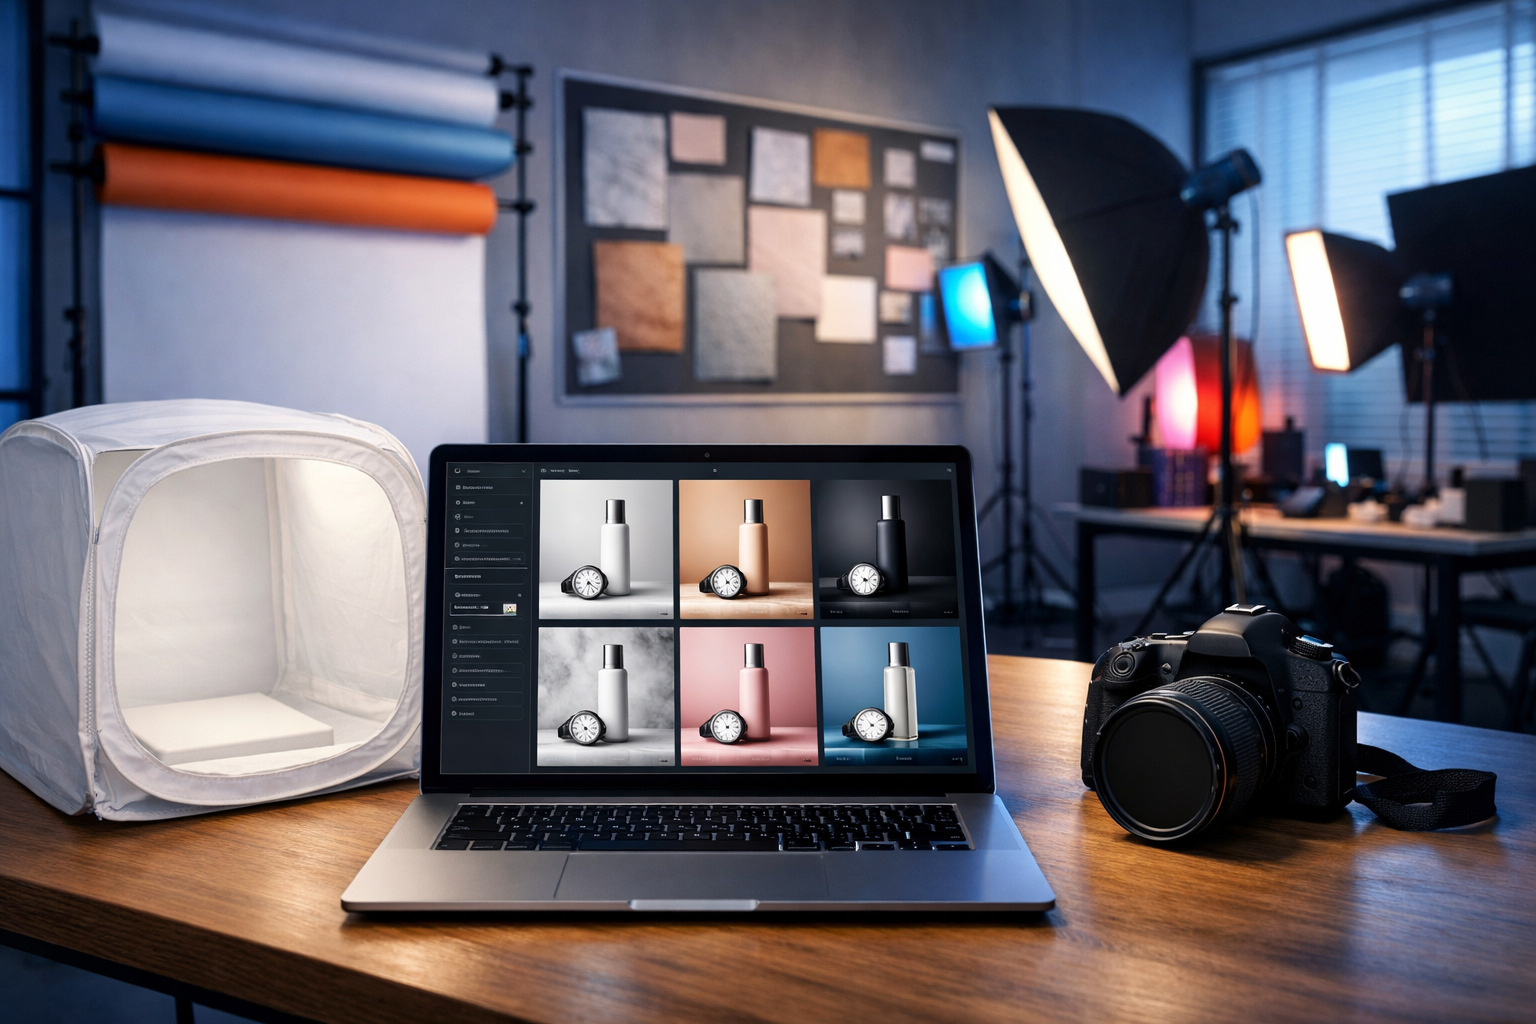
3) Background and style variation: best for scaling creatives
Once you have a “hero” look you like, you can generate variations: different backgrounds, props, seasonal themes, and aspect ratios. This is where AI shines for ecommerce teams that need quantity without sacrificing consistency.
A repeatable workflow for AI product photography (studio look)
Use this workflow whenever you want studio-grade shots without a camera. It’s designed to reduce randomness and keep results consistent.
Step 1: Define your “studio brief” (before prompting)
Write a short brief describing the look and constraints:
- Background: pure white, light grey, seamless paper, gradient, or textured (marble/concrete).
- Lighting: softbox, high-key, low-key, rim light, top light, warm/cool temperature.
- Lens/composition: 50mm product shot, centred hero, 3/4 angle, macro detail.
- Surface: glossy acrylic, matte plinth, reflective black, natural wood.
- Brand rules: key colours, premium vs playful, minimal vs bold.
This brief becomes your prompt template and your quality checklist.
Step 2: Build a prompt that controls the camera you don’t have
To “generate studio shots without a camera”, you still need to describe camera-like decisions: lighting modifiers, lens, angle, and background. Strong prompts tend to include:
- Subject: product type, materials, finish, colours, notable design details.
- Scene: studio setup (seamless backdrop, softboxes), surface and props (or none).
- Lighting: “soft diffused light”, “high-key”, “gentle shadow under product”.
- Composition: “centred”, “rule of thirds”, “negative space for cropping”.
- Quality cues: “photorealistic”, “sharp label”, “clean edges”, “no distortion”.
Prompt examples you can copy
Example A: Classic ecommerce hero on white
“Photorealistic studio product photo of a 250ml minimalist skincare bottle with a matte white label and black pump, centred on a pure white seamless background, high-key softbox lighting, soft shadow under the bottle, 50mm lens look, ultra-sharp edges, realistic plastic reflections, clean commercial style, no props, no text, no watermark.”
Example B: Premium dark studio with rim light
“Photorealistic studio shot of a stainless steel wristwatch on a matte black acrylic plinth, dark charcoal seamless backdrop, dramatic rim lighting, controlled specular highlights on metal, subtle fog-free atmosphere, crisp focus on dial, shallow depth of field, luxury advertising style, no brand logos, no text.”
Example C: Soft lifestyle “studio-lifestyle” hybrid
“Photorealistic product photo of a ceramic coffee mug in a bright home kitchen setting, soft natural window light, clean minimal styling, neutral tones, gentle shadows, 3/4 angle, editorial lifestyle look, realistic glaze texture, uncluttered background bokeh, no text, no watermark.”
Step 3: Generate variations and pick a ‘winner’ style
Instead of chasing perfection in one output, generate multiple options and compare them against your brief. Pick a single “winner” style for each product line (e.g., skincare = high-key white; jewellery = dark luxury; home goods = natural light).
Once you have a consistent style, scaling becomes straightforward: you reuse the same prompt structure and only change the product-specific details.
Step 4: Create a full image set for ecommerce
Most product pages perform better with a structured set rather than a single hero image. Aim for:
- Hero on plain background (marketplace-friendly).
- 3/4 angle to show depth.
- Back/side view for packaging or ports.
- Close-up detail (texture, ingredients, mechanism).
- Scale shot (in-hand or next to a familiar object).
- Lifestyle scene (context of use).
Generate each image with consistent lighting and colour temperature so your catalogue looks cohesive.
How to keep the product consistent across multiple AI images
Consistency is the biggest challenge when you generate studio shots without a camera. These tactics help:
- Standardise your prompt template: keep the same lighting, lens look, background, and composition wording. Only swap product descriptors.
- Use a reference image when you can: even a simple, well-lit phone photo improves shape and label fidelity.
- Lock the “non-negotiables”: e.g., “matte white label”, “black pump”, “amber glass”, “rounded corners”.
- Ask for clean edges and accurate reflections: product shots often fail at messy cut-outs and unrealistic glare.
- Generate in batches: produce all angles for one SKU in one session so the model stays close to your described style.
Common mistakes (and how to fix them)
Unrealistic materials and reflections
If metal looks like plastic (or vice versa), add material specifics: “brushed aluminium”, “anodised finish”, “matte glass”, “subtle micro-scratches”, “realistic specular highlights”. For glossy products, request “controlled highlights” to avoid blown-out glare.
Warped labels or unreadable packaging
Avoid asking AI to render tiny legal text. Instead, request “clean label with minimal typography, sharp and straight” and plan to overlay exact text later in your design tool if needed. If you must include branding, rely on reference-led generation and check compliance.
Busy backgrounds that reduce conversion
For ecommerce hero images, simpler usually converts better. Specify: “plain seamless background, no props, negative space” and reserve lifestyle scenes for secondary images and ads.
Inconsistent colours across images
Colour shifts happen when lighting changes. Keep a consistent lighting description (“neutral 5600K daylight softbox”) and avoid mixing warm and cool lighting across the same SKU set.
Turning AI product photos into a complete marketing kit (in one platform)
The real advantage isn’t just generating a studio shot—it’s producing every supporting asset quickly. With Gen AI Last you can build a full launch pack:
- Product descriptions: benefit-led copy, ingredient explanations, FAQs, and comparison tables using AI Text Generation.
- Ad creatives: multiple image variations for different hooks and audiences using AI Image Generation.
- Short promos: turn the same product angle into a punchy reel or demo using AI Video Generation.
- Voice-overs: explainer narration for product videos or UGC-style scripts using AI Audio Generation.
If you’re building on a startup budget, you can view pricing from $10/month for full access to text, image, audio, and video generation.
Practical use cases (with prompt angles)
Ecommerce listing refresh in one afternoon
Refresh stale listings by generating a new hero image style and 3–5 supporting angles. Prompt angle: “high-key studio, consistent shadows, centred composition, marketplace-friendly background”.
Seasonal campaigns without reshoots
Keep the product identical but change the set dressing: winter (cool tones, subtle frost props), summer (bright natural light, citrus accents), or gifting (ribbon, premium box). Prompt angle: “same product, new environment, maintain lighting consistency”.
A/B testing ad creatives
Generate variations that isolate one change at a time: background colour, prop style, camera angle, or shadow hardness. Then test which image drives clicks and conversions. Prompt angle: “minimal change variants, same framing, same product scale”.
Quality checklist: what “studio-ready” should look like
Before publishing, check your AI-generated product photo against this list:
- Edges: clean outline, no melting contours, no odd halos.
- Shadows: believable contact shadow under the product (not floating).
- Reflections: match the material and surface; avoid chaotic glare.
- Symmetry: lids, pumps, and product geometry look mechanically plausible.
- Brand consistency: correct colours, finish, and overall “feel” for your category.
- Crop flexibility: enough negative space for different placements and aspect ratios.
Legal and trust considerations (important for ecommerce)
If you’re generating images of a real product, make sure the visuals are not misleading. Customers should receive what they believe they’re buying. Practical safeguards:
- Avoid inventing features: don’t show accessories, finishes, or add-ons you don’t ship.
- Be careful with claims: “clinically proven” or regulated claims should be verified and compliant.
- Respect trademarks and trade dress: don’t imitate another brand’s distinctive packaging.
- Use real photos where required: some marketplaces have strict policies for hero images.
A sensible approach is hybrid: use AI to generate studio-quality scenes and variations, while keeping core product accuracy grounded in reference images and verified specs.
A simple “starter kit” workflow for small teams
If you’re starting from scratch, this is a practical order of operations:
- Generate (or refine) one hero studio style for your category.
- Create a prompt template and save it as your internal SOP.
- Produce a full set of listing images per SKU.
- Use AI Text Generation to write the title, bullets, and description matching the visuals.
- Create 10–20 ad image variants and 2–3 short videos for testing.
To try the workflow quickly, start creating for free and build your first studio-style product set.
FAQs: AI product photography without a camera
Can AI replace a professional product photographer?
For many ecommerce needs—especially variant generation, background changes, and fast creative testing—AI can reduce reliance on frequent studio shoots. For high-end campaigns, regulated products, or strict marketplace rules, professional photography can still be the safest option.
Will AI-generated product photos look “fake”?
They can, if the prompt is vague or the scene is overly complex. Studio-style setups (seamless backgrounds, controlled lighting, minimal props) are the easiest to make convincingly photorealistic.
What’s the fastest way to get consistent results?
Use a standard prompt template, keep lighting consistent, and generate in batches. When accuracy matters, use a reference image rather than text-only generation.
Next steps
If your goal is “ai product photography generate studio shots without a camera”, focus on a controllable studio prompt, build a repeatable template, and scale variants for listings and ads. Gen AI Last makes this easier by combining image generation with the copy, video, and audio you need to launch and promote products—without stitching together multiple tools. Explore our AI content tools and produce your first studio set in minutes.
Ready to Create with Generative AI?
Join thousands of creators using Gen AI Last to generate text, images, audio, and video — all from one platform. Start your 7-day free trial today.
Start Free — Try 7 DaysQuick Links
Create AI content from $10/month
View Plans