How to Generate AI Images for Blog Posts (Step-by-Step)
Learning how to generate AI images for blog posts can cut production time dramatically while helping you publish more consistently, improve engagement, and reinforce your brand. The key is not just “making pretty pictures”, but creating visuals that match your topic, support your message, and load quickly without hurting SEO. This guide walks you through a practical, repeatable workflow you can use today.
Why AI images matter for blog performance
Strong visuals do more than decorate a page. They help readers understand complex ideas, increase time on page, and make your content more shareable. AI image generation makes this easier because you can quickly produce:
- Featured images that set expectations and improve click-through from social shares
- In-article illustrations that clarify steps, comparisons, and frameworks
- Consistent visual themes across a content series
- Variations for A/B testing (different compositions, colours, moods)
With an all-in-one platform like our AI content tools, you can plan your post, generate the text, create supporting images, and even produce video or audio companions—all from the same workflow.
Before you generate: decide what images your blog post needs
Most bloggers generate one hero image and stop. A better approach is to map visuals to reader needs. For each post, decide which image types you’ll create:
- Featured/hero image (sets the theme; ideal for social previews)
- Section header visuals (lightweight images that break up long pages)
- Explainer illustrations (process diagrams, conceptual visuals, comparisons)
- Product or tool mockups (if you review software or show workflows)
- Image assets for repurposing (Pinterest pins, LinkedIn banners, story formats)
Tip: If you’re targeting 1,500–2,000 words, aim for 4–8 images, depending on how instructional the article is.
Step-by-step: how to generate AI images for blog posts
Step 1: Define the visual brief (topic, audience, intent)
Your prompt will be stronger if you first clarify three things:
- Topic: What exactly is the post about?
- Audience: Beginners, professionals, founders, hobbyists?
- Intent: Informational guide, comparison, case study, product walkthrough?
Example: For a post on “how to generate AI images for blog posts”, your visuals should show practical creation scenes—laptops, prompt refinement, image variants, aspect ratios, blog layout previews—rather than abstract robots.
Step 2: Choose a consistent style (so your blog looks branded)
Consistency is what makes AI images look intentional instead of random. Pick a style guide for a content series and stick to it. Consider:
- Look: photorealistic, 3D render, flat vector, editorial illustration
- Palette: 2–4 core colours (match your site theme)
- Lighting: warm natural, cool tech, dramatic studio, neon accents
- Composition: clean negative space for headers, or detailed scenes for tutorials
If you publish regularly, create a “prompt base” that always includes your style choices. You’ll see sample bases later in this guide.
Step 3: Write a high-performing prompt (use a reliable structure)
A strong prompt is specific, visual, and constrained. Use this structure:
- Subject: what’s in the image?
- Setting: where is it happening?
- Action: what is the person/object doing?
- Style: photorealistic/illustrated, lens, depth of field
- Lighting: soft window light, blue tech glow, golden hour, etc.
- Composition: 16:9, negative space, close-up/wide shot
- Restrictions: no text, no logos, no watermarks, no distorted hands
Practical prompt example (hero image):
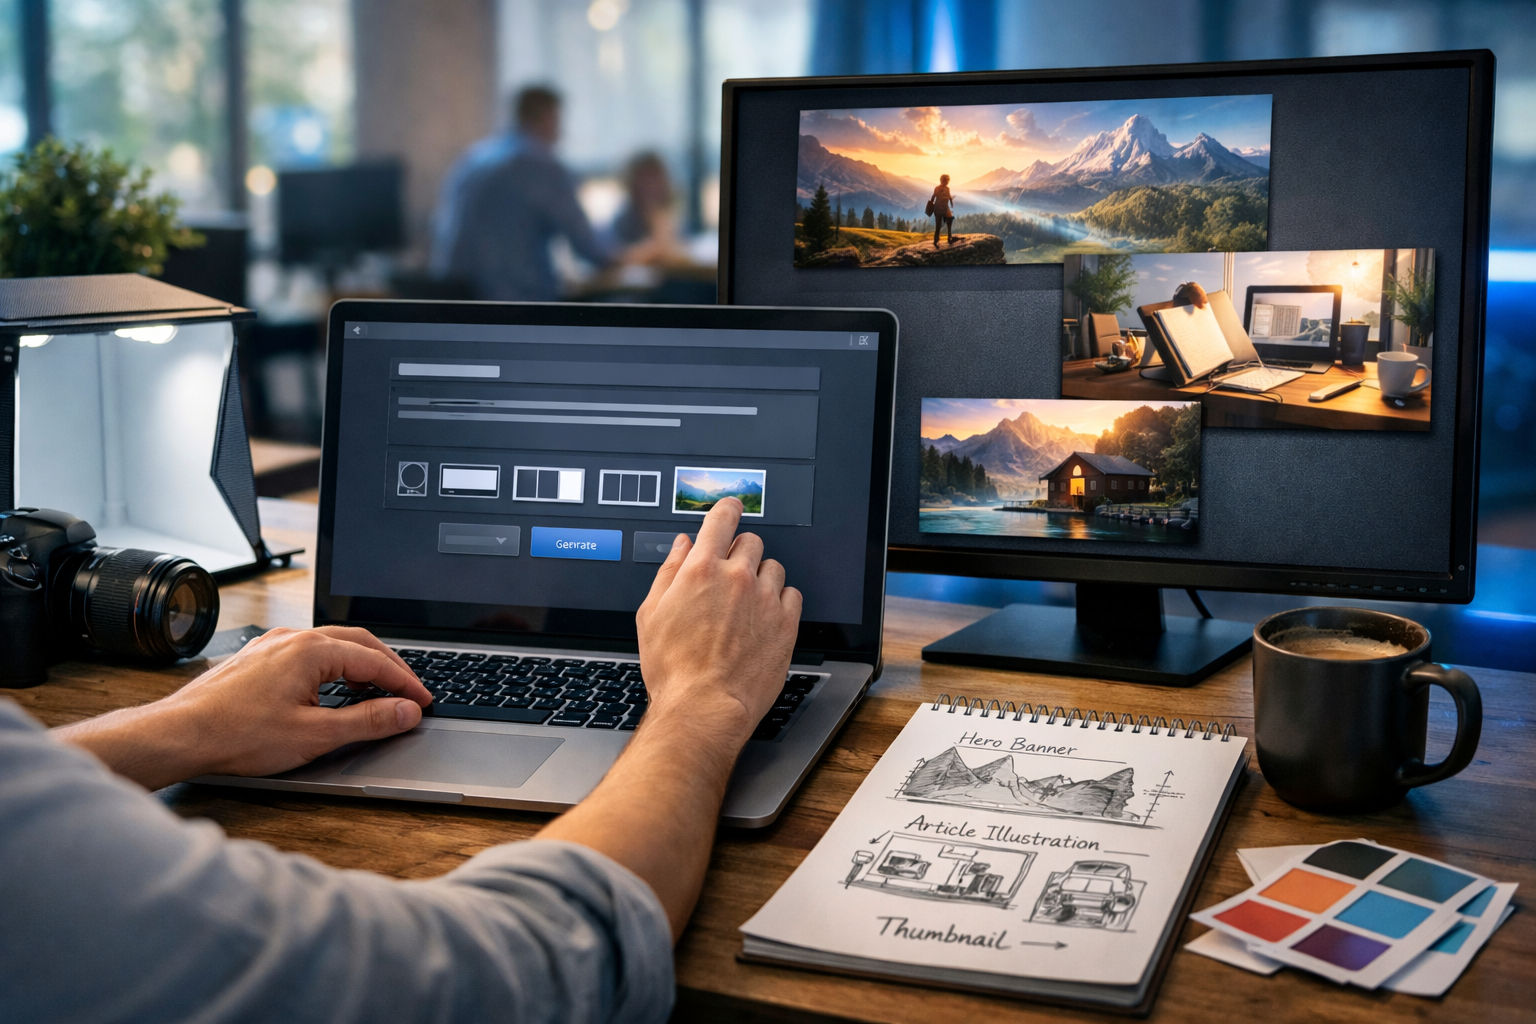
“Photorealistic 16:9 wide shot of a blogger in a home office generating AI images for a blog post on a laptop, with multiple image variations visible on a second monitor (no readable text), colour swatches and a style guide on the desk, soft natural window light, cool blue screen glow, shallow depth of field, clean composition with negative space on the right, no logos, no watermark.”
Step 4: Generate variants (don’t settle for the first output)
The fastest way to improve quality is to generate variations and compare. Create 4–8 options, then select the one that fits your layout best. When refining, change one variable at a time:
- Adjust camera angle: top-down desk shot vs. eye-level scene
- Change lighting: warm studio vs. cool tech ambience
- Simplify composition: fewer objects, more negative space for headings
- Shift style: editorial illustration for complex concepts
With Gen AI Last, you can generate visuals quickly alongside your written draft so your images match your headings and examples.
Step 5: Pick the right sizes and aspect ratios for blog use
AI images can look great but still perform poorly if they’re the wrong shape or too heavy. Use these common targets:
- Featured image: 16:9 (e.g., 1600×900 or 1920×1080)
- In-article images: 3:2 or 4:3 (e.g., 1200×800) for tutorials
- Social repurpose: 1:1 (square), 4:5 (feed), 9:16 (stories/reels)
If your theme uses a wide hero banner, prioritise 16:9 so it crops cleanly across devices.
Step 6: Optimise images for SEO (file size, naming, alt text)
Search engines can’t “see” your image like humans do; they rely on context and metadata. Do the basics every time:
- Compress: export as WebP where possible; keep most images under ~200KB (hero can be higher if needed)
- Descriptive filename: use keywords naturally (e.g., generate-ai-images-for-blog-posts-hero.webp)
- Alt text: describe what’s shown, not what you want to rank for
- Captions (optional): useful for instructional posts—captions can improve comprehension
Alt text example for this topic: “Blogger refining an AI image prompt on a laptop with blog image variations on a second monitor.”
Step 7: Maintain trust and compliance (avoid misleading visuals)
AI images are powerful, but use them responsibly—especially in YMYL-adjacent niches (health, finance, legal). Follow these rules:
- Don’t generate “fake screenshots” of analytics, dashboards, or testimonials that imply real results
- Avoid realistic depictions of real people presented as customers or staff unless you have permission
- Use clearly illustrative visuals for sensitive topics
- If needed, add a short disclosure that some images are AI-generated illustrations
Prompt templates you can copy and adapt
Use these templates to speed up your workflow. Replace the bracketed sections with your topic and brand style.
Template 1: Featured image (clean, blog-friendly)
“Photorealistic 16:9 wide hero image of [SUBJECT] in [SETTING], showing [ACTION] related to [BLOG TOPIC]. Clean composition with negative space for a headline, [LIGHTING STYLE], shallow depth of field, realistic colours, no text, no logos, no watermarks.”
Template 2: Step-by-step tutorial image
“Photorealistic 4:3 image showing close-up hands using a laptop to [TASK], with visible UI elements but no readable text, desk accessories like [OBJECTS], soft natural light, high detail, realistic textures, no logos, no watermark.”
Template 3: Conceptual illustration (for abstract ideas)
“Editorial illustration, 16:9, depicting [ABSTRACT CONCEPT] as [VISUAL METAPHOR], minimal style, limited colour palette [COLOURS], crisp lines, subtle gradients, lots of negative space, no text.”
Template 4: Product/mockup style visual (without fake claims)
“Photorealistic studio scene of a laptop and smartphone displaying a generic blog layout (no readable text) with image placeholders, surrounded by content creation tools (camera, notebook, pen), [LIGHTING], 16:9, clean and modern, no logos, no watermark.”
Practical workflow: create a full post with matching images using Gen AI Last
Here’s a simple end-to-end process for a small team or solo creator:
- Outline the article: generate a structured outline and headings with AI text generation.
- Decide image placements: assign 1 hero image + 3–6 in-article visuals mapped to key sections.
- Draft prompt bases: create a consistent style line (palette, lighting, lens, restrictions).
- Generate image batches: produce variations for each placement and choose the best fit.
- Optimise and publish: compress, rename files, add alt text, and ensure consistent sizing.
- Repurpose: turn the post into social graphics, a short explainer video, or a narrated audio version.
Because Gen AI Last includes text, image, video, and audio generation in every plan, you can keep everything aligned without juggling multiple subscriptions. If you’re cost-conscious, view pricing from $10/month to see what fits your publishing cadence.
Common problems (and how to fix them)
Problem: The image looks generic or unrelated to the post
Fix: Add concrete blog objects and actions. Mention “blog header layout”, “in-article illustration”, “featured thumbnail”, “prompt iterations”, “aspect ratios”, “content calendar”, “CMS draft view”. The more your prompt reflects real blogging, the more relevant the output.
Problem: Hands, screens, or small details look distorted
Fix: Use cleaner compositions and avoid demanding perfect readable UI text. Ask for “no readable text” and focus on the scene. Crop tighter on the usable area and prioritise images that will be displayed smaller on-page.
Problem: Your blog looks visually inconsistent across posts
Fix: Create a reusable “brand prompt line”, such as: “modern, minimal, soft natural light, neutral tones with teal accents, photorealistic, shallow depth of field, clean negative space, no logos, no text”. Append it to every image prompt.
Problem: Images slow down the site
Fix: Export WebP, resize to your theme’s maximum display width, compress aggressively for in-article images, and lazy-load below-the-fold visuals. One huge uncompressed hero image can undo your SEO gains.
Advanced tips: make AI images support E-E-A-T
To strengthen perceived experience and trust, align visuals with real-world context:
- Use process visuals: show “how it’s done” (workstations, tools, steps), not vague futuristic imagery.
- Match claims with imagery: if you discuss “prompt iteration”, show multiple variants on a screen.
- Show credible environments: co-working spaces, agency desks, studio setups—appropriate to your niche.
- Maintain accessibility: good contrast, clear subjects, descriptive alt text.
Quick checklist: generating AI images for blog posts
- Decide image types (hero + supporting visuals)
- Pick a consistent style (palette, lighting, composition)
- Write prompts with subject + setting + action + restrictions
- Generate and compare multiple variants
- Export correct aspect ratios and compress for speed
- Use descriptive filenames and natural alt text
- Avoid misleading visuals; keep trust high
Create your first set of blog images today
If you want a simple workflow that covers writing and visuals in one place, Gen AI Last lets you generate blog copy, create matching AI images, and extend your post into video or audio—without paying for separate tools. The fastest way to learn is to start with one article, generate a hero image plus three supporting visuals, and publish.
start creating for free and build a repeatable template you can use for every post you publish.
Ready to Create with Generative AI?
Join thousands of creators using Gen AI Last to generate text, images, audio, and video — all from one platform. Start your 7-day free trial today.
Start Free — Try 7 DaysQuick Links
Create AI content from $10/month
View Plans